Fiber7 TV behind PFSense

As I’ve stated previously, I’m subscribed to what is probably the coolest ISP on earth. Between the full symmetric Gbit/s, their stance on network neutrality, their IPv6 support and their awesome support even for advanced things like setting up an IPv6 reverse DNS delegation(!), there’s nothing you could ever wish for from an ISP.

For some time now, they have also provided an IPTV solution as an additional subscription called tv7.

As somebody who last watched live tv around 20 years ago, I wasn’t really interested to subscribe to that. However, contrary to many other IPTV solutions what’s special about the Fiber7 solution is that they are using IP multicast to deliver the unaltered DVB frames to their users.

For people interested in TV, this is great because it’s, for all intents and purposes, lag free as the data is broadcast directly through their network where interested clients can just pick it up (of course there will be some <1ms lag for the data to move through their network plus some additional <1ms lag as your router forwards the packets to your internal network).

As I never dealt with IP multicast, this was an interesting experiment for me, and when they released their initial offering, they provided a test-stream to see whether your infrastructure was multicast ready or not.

Back then, I never got it to work behind my PFSense setup but as I wasn’t interested in TV, I never bothered spending time on this, though it did hurt my pride.

Fast forward to about three weeks ago where I made a comment on twitter about that pride being hurt to the CEO of fiber7. He informed me that the test stream was down, but then he also sent me a DM to ask me whether I was interested in trying out their tv7 offering, including the beta version of their app for the AppleTV.

That was one evil way to nerd-snipe me, so naturally, I told him that, yes, I would be interested, but that I wasn’t really ever going to use it aside of just getting it to work, because live TV just doesn’t interest me.

Despite the fact that it was past 10pm, he sent me another DM, telling me that he has enabled tv7 for my account.

The rest of the night I spent experimenting with IGMP Proxy and the PFSense firewall to some varying success, but on the next day I was finally successful

You might notice that this is a screenshot of VLC. That’s no coincidence: While Fiber7 officially only supports the AppleTV app, they also offer links on a support page of theirs to m3u and xspf playlists that can be used by advanced users (which is another case of Fiber7 being awesome), so while debugging to make this work, I definitely preferred to using VLC which had a proper debug log.

After I got it to work, I also found a bug in the Beta version of the Fiber7 app where it would never unsubscribe from a multicast group, causing the traffic to my LAN to increase whenever I would switch channels in the app. The traffic wouldn’t decrease even if the AppleTV went to sleep – only a reboot would help.

I’ve reported this to Fiber7 and within a day or two, a new release was pushed to TestFlight in order to fix the issue.

Since this little adventure happened, Fiber7 has changed their offering: Now every Fiber7 account gets free access to tv7 which will probably broaden the possible audience quite a bit.

Which brings me to the second point of this post: To show you the configuration needed if you’re using a PFSense based gateway and you want to make use of tv7.

First, you have to enable the IGMP proxy:

Screen Shot 2018-05-22 at 16.31.15.png

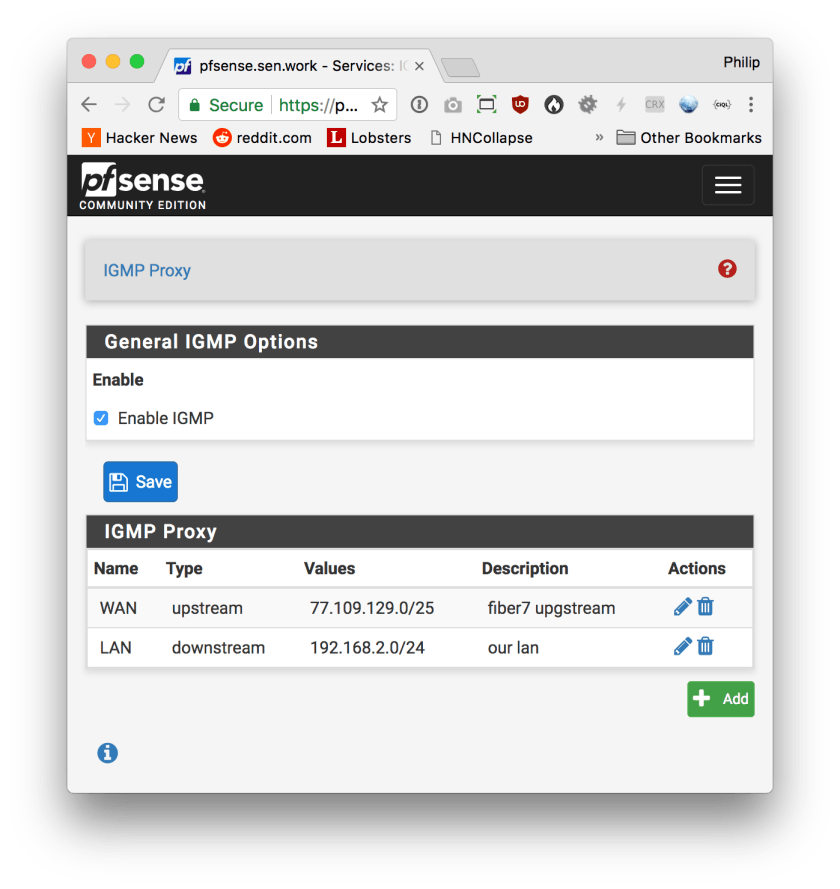
For the LAN interface, please type in the network address and netmask of your internal IPv4 LAN.

What IGMP Proxy does is to listen to clients in your LAN joining to a multicast group and then joining on their behalf on the upstream interface. It will then forward all traffic received on the upstream aimed at the group to the group on the downstream interface. This is where the additional small bit of lag is added, but this is the only way to have multicast cross routing barriers.

This is also mostly done on your routers CPU, but at the 20MBit/s a stream consumes, this shouldn’t be a problem on more or less current hardware.

Anyways – if you want to actually watch TV, you’re not done yet because even though this service is now running, the built-in firewall will drop any packets related to multicast joining and all actual multicast packets containing the video frames.

So the next step is to update the firewall:

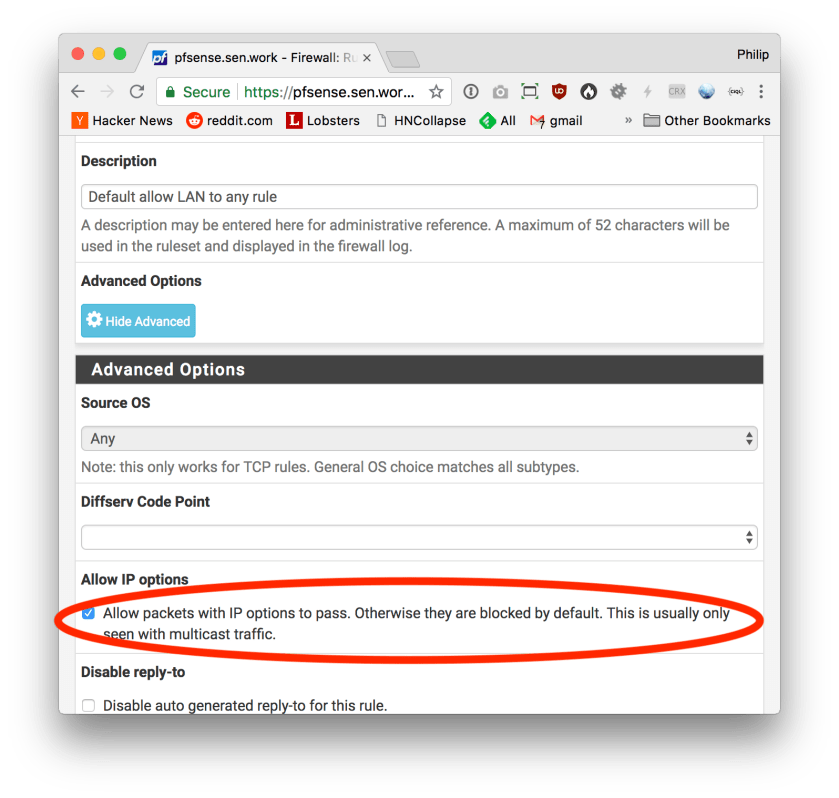
Create the following rules for your WAN interface:

Screen Shot 2018-05-22 at 16.39.07.png

You will notice that little gear icon next to the rule. What that means is that additional options are enabled. The extra option you need to enable is this one here:

Screen Shot 2018-05-22 at 16.41.31.png

I don’t really like the second of the two rules. In principle, you only need to allow a single IP: The one of your upstream gateway. But that might change whenever your IPv4 address changes and I don’t think you will want to manually update your firewall rule every time.

Instead, I’m allowing all IGMP traffic from the WAN net, trusting Fiber7 to not leak other subscriber’s IGMP traffic to my network.

Unfortunately, you’re still not quite done.

While this configures the rules for the WAN interface, the default “pass all” rule on the LAN interface will still drop all video packets because the above “Allow IP options” checkbox is off by default for the default pass all rule.

You have to update that too on the “LAN” interface:

Screen Shot 2018-05-22 at 16.46.47.png

And that’s all.

The network I’m listing there, 77.109.128.0/19 is not documented officially. Fiber7 might change that at any time at which point your nice setup will stop working and you’ll have to update the IGMP Proxy and Firewall configuration.

In my case, I’ve determined the network address by running

/usr/local/sbin/igmpproxy -d -vvvv /var/etc/igmpproxy.conf

and checking out the error message where igmpproxy was not allowing traffic to an unknown network. I’ve then looked up the network of the address using whois and updated my config accordingly.

Tracking runs with the Apple Watch

When I started running this summer, I also wanted to make use of my Apple watch to keep track of my routes and my speed over time, so I looked into the various apps and services around that.

Generally, there are two parts to tracking a run: One part is the actual data gathering that happens while you’re running and the other part is the analysis and comparison other other runs afterwards.

Unfortunately, of all the applications I looked at, none excelled at both, so in the end what I’ve ended up with is writing custom code to give me the best of both worlds.

Here’s what I’ve looked at.

Apple Workouts.app

The built-in Workout app of the watch, being a watch-native app made by Apple, is more equal than other apps: It’s the only app that allows you to trigger the screen lock while in the app and with WatchOS 4 it’s also the only app that gives you very easy access to the media controls. And finally, it’s the only app that can log its tracked workout and movement Activitiy in the Activitiy app in their actual colors instead of just gray (yes. very important this).

It offers very readable data on-screen while it’s running, it can send timely notifications as you pass another kilometre and it never crashes.

Looking at the Map of the run in the Activity app, it also collects very accurate location data.

As good as it is for collecting data, as bad it is for analysis of the data though: The best you can do is have a look at a single workout. There’s no way to compare two – unless you take screenshots and do that manually.

There is also no way to export the data: In the workout details there is a share button, but that just exports a corny text and a useless picture. No detail is included.

Screen Shot 2017-09-04 at 08.51.13.png
Yes. This is all you get from exporting a run. I love the picture. So useful.

So for any analysis you want to do based on runs recorded with the Workouts app, you have to first manually transfer data from screenshots to some other machine readable form and even then: The screenshots alone don’t provide nearly enough useful data.

Strava

This is the other extreme in the list of apps I looked at: It provides excellent analysis and it has an extremely motivating high-score list for user-provided segments of a run. You don’t have to match routes exactly – the moment you run through an existing previously created segment, you’ll be able to compare your effort to others.

Screen Shot 2017-09-04 at 08.47.09.png
Segment rankings (this segment is uphill)

It’s also great at automatically matching previous runs over the same route, so you can compare your runs over time.

Screen Shot 2017-09-04 at 08.44.32.png
Getting faster over time (this mostly uphill too)

The other social features it offers don’t interest me, so I can’t really talk about them.

However: As good as the analysis is, as bad its recording feature is: Of all the apps I looked at it provides the least amount of detail during the run and, what’s worse, its GPS tracking is extremely inaccurate and unreliable.

I’m always running having my phone with me – mainly for easy access to all my media and to Overcast and also because most of my runs I do on my way home from the office where I need the phone anyways. Strava doesn’t make use of this but instead solely relies on the watches GPS which is much less accurate than the phones.

I can understand this: The device is smaller, so it’s harder to put in powerful antennas, it has way less battery and a much weaker CPU than the phone, so it just can’t be as good. It’s totally ok for when you only have the watch with you, but when you have the phone with you, it’s a shame if the app can’t use it.

Runkeeper

Runkeeper uses both the watch and the phone for location tracking and it provides a great UI while the workout is ongoing.

Its analysis features aren’t as good as the ones from Strava though. It doesn’t do the automated segment high-scoring and it’s not as good at comparing runs over the same route with each other.

And finally, the UI of the site doesn’t look as polished as does Strava’s – but that’s just a matter of taste I guess.

… master of none

For all of July and August, my mode of operation was to use Runkeeper to acquire the data during the run and then to export a .gpx file from their site and to import it into Strava.

This gave me the best of both worlds: Very good data gathering and very good data analysis.

However, I wasn’t entirely happy with this either as the process was somewhat cumbersome and, lately, unstable.

Probably caused by iOS 11 Beta, I’ve seen various failure modes related to Runkeeper, all of wich are very annoying:

  1. The workout might start on the Watch but it will not manage to also start it on the phone. This way, the workout will be tracked, but no route data will be saved.
  2. Runkeeper on the phone will crash after about 10 minutes. There’s no indication of this happening, but the result will be that a 10 minutes run is logged instead of the real data on the watch. If this happens, there is no way to even just get to the data without the route.

Issue 1) I could work around often by launching Runkeeper manually on the phone, then starting the workout on the watch and then making sure that the workout would also start on the phone.

If that happened, then route data was tracked correctly.

Unfortunately, sometimes, this stopped working all-together and the only way for the watch to talk to the phone again was to completely uninstall and reinstall Runkeeper on both the Phone and the Watch. This is annoying when you want to start running, but you can’t because the Software-gods have put 20 minutes of fiddling with the App Store in front of you (also, Runkeeper is bigger than the App Store’s 3G download limit, so you better have wifi  available).

Issue 2) is much worse though: There’s no indication of it happening. You’d think that the blue bar “Runkeeper is actively using your location” on the phone would be a good indicator, but it isn’t: When the crash happens, the bar stays there until you unlock your phone. Then it goes away.

So there’s no way to be sure unless you periodically unlock your phone which is very annoying and distracting during the run – especially as you’re sweaty and TouchID won’t work most of the time (I use a strong 25 character password).

I know – even if it isn’t tracked, a run is a run. But it certainly doesn’t feel that way and how it feels is very important to keep motivated to doing this – especially under bad weather conditions.

let’s just hack it

Now, admittedly, these are very likely beta-woes that will eventually solve themselves. We’re pretty far into the beta cycle though (Beta 9 at the time of this writing), so I’m suspicious that these issues won’t be fixed come release but will have to wait for a future update to either Runkeeper or the OS.

Losing about a third of my runs to software issues felt really unacceptable to me, especially considering that Runkeeper still wasn’t offering some features that the workout app was (like enabling the screen lock – which is important when running in the rain).

However, when I looked again at the WWDC sessions this year, I found out that IOS11 will finally offer an API to read and write route data for workouts. This means that the data you track using Apple’s built-in app will finally be available to other apps to read.

This would give me the best of all worlds: Use the best data-gathering app and export it to the best analysis app; side-stepping the stability issues.

IMG_1324.png
Such Wow. Much UI.

So, this weekend, I hacked together a quick solution (MIT licensed) that does exactly this. It lists you all your workouts and if you tap one, it will eventually show you a share-sheet, allowing you to select a location to store a .gpx file to.

That file contains all the information required for Strava to do its analysis.

In a perfect world, this app would of course upload directly to Strava. And it would not block the UI thread while it’s exporting the gpx file. And it would actually have some UI to speak of.

But this was a quick-hack that solved an issue for me – and who knows – maybe it will fix it for you.

If you need a real solution for this, Twitter user @dwlz is apparently working on a real app that will be usable for normal people and I’ll definitely switch to that when it’s ready. But until then, I can finally track my runs with the peace of mind of having a crash-free solution that still provides the best analysis possible.

Screen Shot 2017-09-04 at 08.54.14.png
A run tracked with the Workout app and uploaded to Strava using my hack

How I back up gmail

There was a discussion on HackerNews about Gmail having lost the email in some accounts. One sentiment in the comments was clear:

It’s totally the users problem if they don’t back up their cloud based email.

Personally, I think I would have to agree:

Google is a provider like every other ISP or basically any other service too. There’s no reason to believe that your data is more save on Google than it is any where else. Now granted, they are not exactly known for losing data, but there’s other things that can happen.

Like your account being closed because whatever automated system believed your usage patterns were consistent with those of a spammer.

So the question is: What would happen if your Google account wasn’t reachable at some point in the future?

For my company (using commercial Google Apps accounts), I would start up that IMAP server which serves all mail ever sent to and from Gmail. People would use the already existing webmail client or their traditional IMAP clients. They would lose some productivity, but no single byte of data.

This was my condition for migrating email over to Google. I needed to have a back up copy of that data. Otherwise, I would not have agreed to switch to a cloud based provider.

The process is completely automated too. There’s not even a backup script running somewhere. Heck, not even the Google Account passwords have to be stored anywhere for this to work.

So. How does it work then?

Before you read on, here are the drawbacks of the solution:

  • I’m a die-hard Exim fan (long story. It served me very well once – up to saving-my-ass level of well), so the configuration I’m outlining here is for Exim as the mail relay.
  • Also, this only works with paid Google accounts. You can get somewhere using the free ones, but you don’t get the full solution (i.e. having a backup of all sent email)
  • This requires you to have full control over the MX machine(s) of your domain.

If you can live with this, here’s how you do it:

First, you set up your Google domain as normal. Add all the users you want and do everything else just as you would do it in a traditional set up.

Next, we’ll have to configure Google Mail for two-legged OAuth access to our accounts. I’ve written about this before. We are doing this so we don’t need to know our users passwords. Also, we need to enable the provisioning API to get access to the list of users and groups.

Next, our mail relay will have to know about what users (and groups) are listed in our Google account. Here’s what I quickly hacked together in Python (my first Python script ever – be polite while flaming) using the GData library:

import gdata.apps.service

consumer_key = 'yourdomain.com'
consumer_secret = '2-legged-consumer-secret' #see above
sig_method = gdata.auth.OAuthSignatureMethod.HMAC_SHA1

service = gdata.apps.service.AppsService(domain=consumer_key)
service.SetOAuthInputParameters(sig_method, consumer_key,
  consumer_secret=consumer_secret, two_legged_oauth=True)

res = service.RetrieveAllUsers()
for entry in res.entry:
    print entry.login.user_name

import gdata.apps.groups.service

service = gdata.apps.groups.service.GroupsService(domain=consumer_key)
service.SetOAuthInputParameters(sig_method, consumer_key,
  consumer_secret=consumer_secret, two_legged_oauth=True)
res = service.RetrieveAllGroups()
for entry in res:
    print entry['groupName']

Place this script somewhere on your mail relay and run it in a cron job. In my case, I’m having its output redirected to /etc/exim4/gmail_accounts. The script will emit one user (and group) name per line.

Next, we’ll deal with incoming email:

In the Exim configuration of your mail relay, add the following routers:

yourdomain_gmail_users:
  driver = accept
  domains = yourdomain.com
  local_parts = lsearch;/etc/exim4/gmail_accounts
  transport_home_directory = /var/mail/yourdomain/${lc:$local_part}
  router_home_directory = /var/mail/yourdomain/${lc:$local_part}
  transport = gmail_local_delivery
  unseen

yourdomain_gmail_remote:
  driver = accept
  domains = yourdomain.com
  local_parts = lsearch;/etc/exim4/gmail_accounts
  transport = gmail_t

yourdomain_gmail_users is what creates the local copy. It accepts all mail sent to yourdomain.com, if the local part (the stuff in front of the @) is listed in that gmail_accounts file. Then it sets up some paths for the local transport (see below) and marks the mail as unseen so the next router gets a chance too.

Which is yourdomain_gmail_remote. This one is again checking domain and the local part and if they match, it’s just delegating to the gmail_t remote transport (which will then send the email to Google).

The transports look like this:

gmail_t:
  driver = smtp
  hosts = aspmx.l.google.com:alt1.aspmx.l.google.com:
    alt2.aspmx.l.google.com:aspmx5.googlemail.com:
    aspmx2.googlemail.com:aspmx3.googlemail.com:
    aspmx4.googlemail.com
  gethostbyname

gmail_local_delivery:
  driver = appendfile
  check_string =
  delivery_date_add
  envelope_to_add
  group=mail
  maildir_format
  directory = MAILDIR/yourdomain/${lc:$local_part}
  maildir_tag = ,S=$message_size
  message_prefix =
  message_suffix =
  return_path_add
  user = Debian-exim
  create_file = anywhere
  create_directory

the gmail_t transport is simple. The local one you might have to patch up users and groups plus the location where you what to write the mail to.

Now we are ready to reconfigure Google as this is all that’s needed to get a copy of every inbound mail into a local maildir on the mail relay.

Here’s what you do:

  • You change the MX of your domain to point to this relay of yours

The next two steps are the reason you need a paid account: These controls are not available for the free accounts:

  • In your Google Administration panel, you visit the Email settings and configure the outbound gateway. Set it to your relay.
  • Then you configure your inbound gateway and set it to your relay too (and to your backup MX if you have one).

This screenshot will help you:

gmail config

All email sent to your MX (over the gmail_t transport we have configured above) will now be accepted by gmail.

Also, Gmail will now send all outgoing Email to your relay which needs to be configured to accept (and relay) email from Google. This pretty much depends on your otherwise existing Exim configuration, but here’s what I added (which will work with the default ACL):

hostlist   google_relays = 216.239.32.0/19:64.233.160.0/19:66.249.80.0/20:
    72.14.192.0/18:209.85.128.0/17:66.102.0.0/20:
    74.125.0.0/16:64.18.0.0/20:207.126.144.0/20
hostlist   relay_from_hosts = 127.0.0.1:+google_relays

And lastly, the tricky part: Storing a copy of all mail that is being sent through Gmail (we are already correctly sending the mail. What we want is a copy):

Here is the exim router we need:

gmail_outgoing:
  driver = accept
  condition = "${if and{
    { eq{$sender_address_domain}{yourdomain.com} }
    {=={${lookup{$sender_address_local_part}lsearch{/etc/exim4/gmail_accounts}{1}}}{1}}} {1}{0}}"
  transport = store_outgoing_copy
  unseen

(did I mention that I severely dislike RPN?)

and here’s the transport:

store_outgoing_copy:
  driver = appendfile
  check_string =
  delivery_date_add
  envelope_to_add
  group=mail
  maildir_format
  directory = MAILDIR/yourdomain/${lc:$sender_address_local_part}/.Sent/
  maildir_tag = ,S=$message_size
  message_prefix =
  message_suffix =
  return_path_add
  user = Debian-exim
  create_file = anywhere
  create_directory

The maildir I’ve chosen is the correct one if the IMAP-server you want to use is Courier IMAPd. Other servers use different methods.

One little thing: When you CC or BCC other people in your domain, Google will send out multiple copies of the same message. This will yield some message duplication in the sent directory (one per recipient), but as they say: Better backup too much than too little.

Now if something happens to your google account, just start up an IMAP server and have it serve mail from these maildir directories.

And remember to back them up too, but you can just use rsync or rsnapshot or whatever other technology you might have in use. They are just directories containing one file per email.

Find relation sizes in PostgreSQL

Like so many times before, today I was yet again in the situation where I wanted to know which tables/indexes take the most disk space in a particular PostgreSQL database.

My usual procedure in this case was to dt+ in psql and scan the sizes by eye (this being on my development machine, trying to find out the biggest tables I could clean out to make room).

But once you’ve done that a few times and considering that dt+ does nothing but query some PostgreSQL internal tables, I thought that I want this solved in an easier way that also is less error prone. In the end I just wanted the output of dt+ sorted by size.

The lead to some digging in the source code of psql itself (src/bin/psql) where I quickly found the function that builds the query (listTables in describe.c), so from now on, this is what I’m using when I need to get an overview over all relation sizes ordered by size in descending order:

select
  n.nspname as "Schema",
  c.relname as "Name",
  case c.relkind
     when 'r' then 'table'
     when 'v' then 'view'
     when 'i' then 'index'
     when 'S' then 'sequence'
     when 's' then 'special'
  end as "Type",
  pg_catalog.pg_get_userbyid(c.relowner) as "Owner",
  pg_catalog.pg_size_pretty(pg_catalog.pg_relation_size(c.oid)) as "Size"
from pg_catalog.pg_class c
 left join pg_catalog.pg_namespace n on n.oid = c.relnamespace
where c.relkind IN ('r', 'v', 'i')
order by pg_catalog.pg_relation_size(c.oid) desc;

Of course I could have come up with this without source code digging, but honestly, I didn’t know about relkind s, about pg_size_pretty and pg_relation_size (I would have thought that one to be stored in some system view), so figuring all of this out would have taken much more time than just reading the source code.

Now it’s here so I remember it next time I need it.

Windows 2008 / NAT / Direct connections

Yesterday I ran into an interesting problem with Windows 2008’s implementation of NAT (don’t ask – this was the best solution – I certainly don’t recommend using Windows for this purpose).

Whenever I enabled the NAT service, I was unable to reliably connect to the machine via remote desktop or even any other service that machine was offering. Packets sent to the machine were dropped as if a firewall was in between, but it wasn’t and the Windows firewall was configured to allow remote desktop connections.

Strangely, sometimes and from some hosts I was able to make a connection, but not consistently.

After some digging, this turned out to be a problem with the interface metrics and the server tried to respond over the interface with the private address that wasn’t routed.

So if you are in the same boat, configure the interface metrics of both interfaces manually. Set the metric of the private interface to a high value and the metrics of the public (routed) one to a low value.

At least for me, this instantly fixed the problem.

digg bar controversy

Update: I’ve actually written this post yesterday and scheduled it for posting today. In the mean time, digg has found an even better solution and only shows their bar for logged in users. Still – a solution like the one provided here would allow for the link to go to the right location regardless of the state of the digg bar settings.

Recently, digg.com added a controversial feature, the digg bar, which basically frames every posted link in a little IFRAME.

Rightfully so, webmasters were concerned about this and quite quickly, we had the usual religious war going on between the people finding the bar quite useful and the webmasters hating it for lost page rank, even worse recognition of their site and presumed affiliation with digg.

Ideas crept up over the weekend, but turned out not to be so terribly good.

Basically it all boils down to digg.com screwing up on this, IMHO.

I know that they let you turn off that dreaded digg bar, but all the links on their page still point to their own short url. Only then is the decision made whether to show the bar or not.

This means that all links on digg currently just point to digg itself, not awarding any linked page with anything but the traffic which they don’t necessarily want. Digg-traffic isn’t worth much in terms of returning users. You get dugg, you melt your servers, you return back to be unknown.

So you would probably appreciate the higher page rank you get from being linked at by digg as that leads to increased search engine traffic which generally is worth much more.

The solution on diggs part could be simple: Keep the original site url in the href of their links, but use some JS-magic to still open the digg bar. That way they still get to keep their foot in the users path away from the site, but search engines will now do the right thing and follow the links to their actual target, thus giving the webmasters their page rank back.

How to do this?

Here’s a few lines of jQuery to automatically make links formated in the form

be opened via the digg bar while still working correctly for search engines (assuming that the link’s ID is the digg shorturl):

$(function(){
  $('div#link_container a').click(function(){
    $(this).attr('href') = 'http://digg.com/' + this.id;
  });
});

piece of cacke.

No further changes needed and all the web masters will be so much happier while digg gets to keep all the advantages (and it may actually help digg to increase their pagerank as I could imagine that a site with a lot of links pointing to different places could rank higher than one without any external links).

Webmasters then still could do their usual parent.location.href trickery to get out of the digg bar if they want to, but they could also retain their page rank.

No need to add further complexity to the webs standards because one site decides not to play well.

Playing Worms Armageddon on a Mac

Last weekend, I had a real blast with the Xbox 360 Arcade version of worms. Even after so many years, this game still rules them all, especially (if not only) in multiplayer mode.

The only drawback of the 360 version is the lack of weapons.

While the provided set is all well, the game is just not the same without the Super Banana Bomb or the Super Sheep.

Worms Screenshot

So this is why I looked for my old Worms Armageddon CD and tried to get it to work on todays hardware.

Making it work under plain Vista was easy enough (get the latest beta patch for armageddon, by the way):

Right-Click the Icon, select the compatibility tab, chose Windows XP, Disable Themes and Desktop composition and run the game with administrative privileges.

You may get away with not using one option or the other, but this one worked consistently.

To be really useful though, I wanted to make the game run under OS X as this is my main environment and I really dislike going through the lengthy booting process that is bootcamp.

I tried the various virtualization solutions around – something that should work seeing that the game doesn’t really need much in terms of hardware support.

But unfortunately, this was way harder than anticipated:

  • The initial try was done using VMWare Fusion which looked very good at first, but failed miserably later on: While I was able to launch (and actually use) the games frontend, the actual game was a flickery mess with no known workaround.
  • Parallels failed by displaying a black menu. It was still clickable, but there was nothing on the screen but blackness and a white square border. Googling around a bit led to the idea to set SlowFrontendWorkaround in the registry to 0 which actually made the launcher work, but the game itself crashed consistenly without error message.

In the end, I’ve achieved success using VirtualBox. The SlowFrontendWorkaround is still needed to make the launcher work and the mouse helper of the VirtualBox guest tools needs to be disabled (on the Machine menu, the game still runs with the helper enabled, but you won’t be able to actually control the mouse pointer consistently), but after that, the game runs flawlessly.

Flickerless and with a decent frame rate. And with sound, of course.

To enable the workaround I talked about, use this .reg file.

Now the slaughter of worms can begin :-)

New MacMini (early 09) and Linux

The new MacMinis that were announced this week come with a Firewire 800 port which was reason enough for me to update shion yet again (keeping the host name of course).

All my media she’s serving to my various systems is stored on a second generation Drobo which is currently connected via USB2, but has a lingering FW800 port.

Of course the upgrade to FW800 will not double the transfer rate to and from the drobo, but it should increase it significantly, so I went ahead and got one of the new Minis.

As usual, I entered the Ubuntu (Intrepid) CD, hold c while turning the device on and completed the installation.

This left the Mini in an unbootable state.

It seems that this newest generation of Mac Hardware isn’t capable of booting from an MBR partitioned harddrive. Earlier Macs complained a bit if the harddrive wasn’t correctly partitioned, but then went ahead and booted the other OS anyways.

Not so much with the new boxes it seems.

To finally achieve what I wanted I had to do the following complicated procedure:

  1. Install rEFIt (just download the package and install the .mpkg file)
  2. Use the Bootcamp assistant to repartition the drive.
  3. Reboot with the Ubuntu Desktop CD and run parted (the partitioning could probably be accomplished using the console installer, but I didn’t manage to do it correctly).
  4. Resize the FAT32-partition which was created by the Bootcamp partitioner to make room at the end for the swap partition.
  5. Create the swap partition.
  6. Format the FAT32-partition with something useful (ext3)
  7. Restart and enter the rEFIt partitioner tool (it’s in the boot menu)
  8. Allow it to resync the MBR
  9. Insert the Ubuntu Server CD, reboot holding the C key
  10. Install Ubuntu normally, but don’t change the partition layout – just use the existing partitions.
  11. Reboot and repeat steps 7 and 8
  12. Start Linux.

Additionally, you will have to keep using rEFIt as the boot device control panel item does not recognize the linux partitions any more, so can’t boot from them.

Now to find out whether that stupid resistor is still needed to make the new mini boot headless.

Tunnel munin nodes over HTTP

Last time I’ve talked about Munin, the one system monitoring tool I feel working well enough for me to actually bother to work with. Harsh words, I know, but the key to every solution is simplicity. And simple Munin is. Simple, but still powerful enough to do everything I would want it to do.

The one problem I had with it is that the querying of remote nodes works over a custom TCP port (4949) which doesn’t work behind firewalls.

There are some SSH tunneling solutions around, but what do you do if even SSH is no option because the remote access method provided to you relies on some kind of VPN technology or access token.

Even if you could keep a long-running VPN connection, it’s a very performance intensive solution as it requires resources on the VPN gateway. But this point is moot anyways because nearly all VPNs terminate long running connections. If re-establishing the connection requires physical interaction, then you are basically done here.

This is why I have created a neat little solution which tunnels the munin traffic over HTTP. It works with a local proxy server your munin monitoring process will connect to and a little CGI-script on the remote end.

This will cause multiple HTTP connections per query interval (the proxy uses Keep-Alive though so it’s not TCP connections we are talking about – it’s just hits in the access.log you’ll have to filter out somehow) because it’s impossible for a CGI script to keep the connection open and send data both ways – at least not if your server-side is running plain PHP which is the case in the setup I was designing this for.

Aynways – the solution works flawlessly and helps me to monitor a server behind one hell of a firewall and behind a reverse proxy.

You’ll find the code here (on GitHub as usual) and some explanation on how to use it is here.

Licensed under the MIT license as usual.

VMware shared folders and Visual Studio

ver since I’ve seen the light, I’m using git for every possible situation. Subversion is ok, but git is fun. It changed the way how I do developement. It allowed me to create ever so many fun-features for our product. Even in spare-time – without the fear of never completing and thus wasting them.

I have so many branches of all our projects – every one of them containing useful, but just not ready for prime-time feature. But when the time is right, I will be able to use that work. No more wasting it away because a bugfix touches the same file.

The day I dared to use git was the day that changed how I work.

Now naturally, I wanted to use all that freedom for my windows work aswell, but as you know, git just isn’t quite there yet. In fact, I had an awful lot of trouble with it, mainly because of it’s integrated SSH client that doesn’t work with my putty pageant-setup and stuff.

So I resorted to storing my windows development stuff on my mac file system and using VMware Fusion’s shared folder feature to access the source files.

Unfortunately, it didn’t work very well at first as this is what I got:

Error message saying that the 'Project location is not trusted'

I didn’t even try to find out what happens when I compile and run the project from there, so I pressed F1 and followed the instructions given there to get rid of the message that the “Project location is not trusted”.

I followed them, but it didn’t help.

I tried adding various UNC paths to the intranet zone, but neither worked.

Then I tried sharing the folder via Mac OS X’s built in SMB server. This time, the path I’ve set up using mscorcfg.msc actually seemed to do something. Visual Studio stopped complaining. And then I found out:

Windows treats host names containing a dot (.) as internet resources. Hostnames without dots are considered to be intranet resouces.

celeswindev worked in mscorcfg.msc because celes, not containing a dot, was counted as an intranet resource.

.host contains a dot and this is counted to be an internet resource.

This means that to make the .NET framework trust your VMWare shared folder, you have to add the path to the “Internet_Zone”. Not the “LocalIntranet_Zone”, because the framework loader doesn’t even look there.

Once I’ve changed that configuration, Visual Studio complained that it was unable to parse the host name – it seems to assume them not starting with a dot.

This was fixed by mapping the path to a drive letter like we did centuries ago.

Now VS is happy and I can have the best of all worlds:

  • I can keep my windows development work in a git repository
  • I have a useful (and working) shell and ssh-agent to actually “git svn dcommit” my work
  • I don’t have to export any folders of my mac via SMB
  • Time Machine now also backs up my Windows Work which I had to do manually until now.

Very nice indeed, but now back to work (with git :-) ).